Table of Contents
Introduction Prerequisites What is Thunkable? Basics of Thunkable platform Creating a game using Thunkable Creating a Maze game ConclusionIntroduction
Before getting started with how to create a game on Thunkable, let us understand what is Thunkable. Thunkable is a block-based coding platform that can significantly help kids who want to create mobile games but are very new to coding. Children who love playing games can try making one, as this will boost the creativity of their minds. It focuses on logic and tries to build the imagination and sense of coding in young minds. Children can become developers and creators instead of just being consumers of the games.
Thunkable can prove to be a starting point for such children who are new to the coding world and wish to create their own games.
In this blog, we will learn about how we can make fun games with the help of the Thunkable platform.
Prerequisites
You should have a basic knowledge of block-based codings like scratch platforms or any other one. Should know about the sprite types and sprites. Should be well acquainted with the properties of sprites and how we can change them. Last but not least, you should be well acquainted with the thunkable platforms(if not, don’t worry. Our article covers the same), front-end development, and backend development using two options of design and block in thunkable and game mechanism and working.
What is Thunkable?
Thunkable is a platform that can be used to create iOS, Android, and web applications. This platform is free of cost and involves very low code or no-code experience. The Thunkable platform is created by the MIT media labs, the same people who have created App inventor and scratch platforms before. More than 80,000 users are using Thunkable to build and create innovative apps.
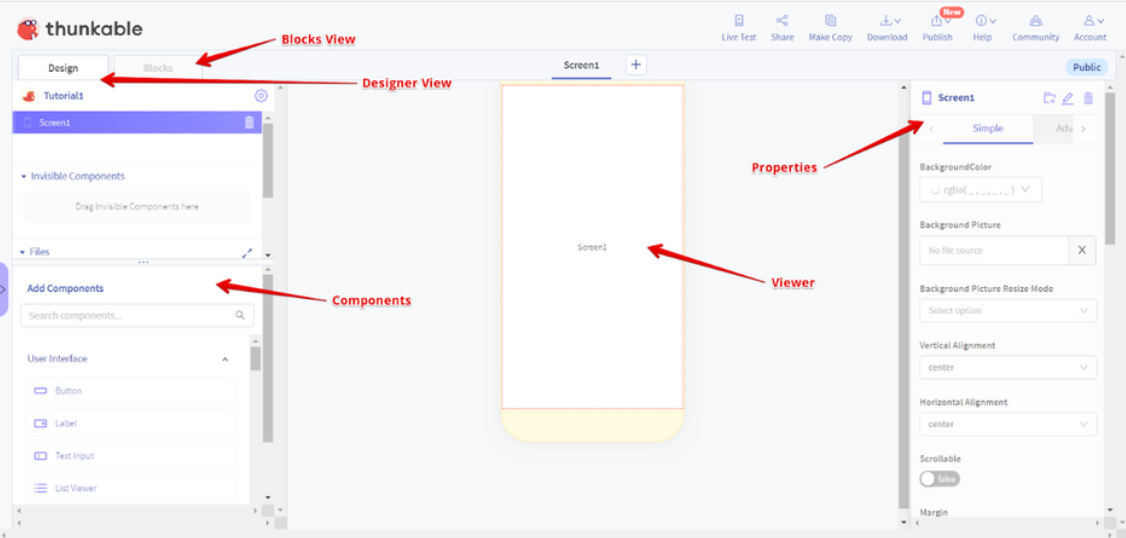
When you create a project in the Thunkable platform, you get an interface where you can do the back-end coding and front-end development. The interface looks as shown below:
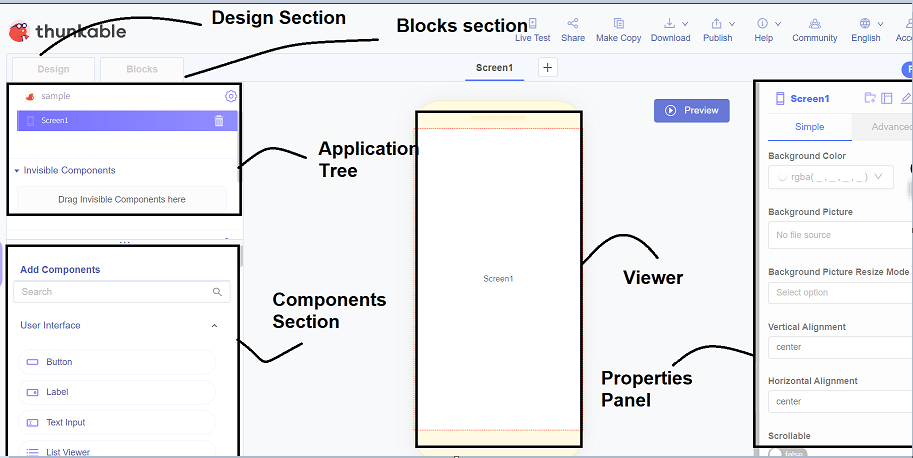
The section’s present interface is as explained below –
Design section – This is the section that is selected by default when you create a project. This helps you build the front end of your app, which involves designing various required screens and adding necessary visible and invisible components.
Blocks section – When you click on it, you are navigated to the different interfaces where you can see various categories of blocks and a workspace where you can drag and drop the required blocks to code for the back end.
Viewer – In this section, you will see all the components and look of your screen. You can switch between the screens by clicking on the screen name at the viewer’s top. All the invisible components added can be seen below the viewer.
Components section – Whether you require any visible or invisible component, all the components are present in this components section. It also provides a search facility wherein you can search for the required component and get it in the filtered list.
Application tree – All the visible components you have added to your app, invisible components added in-app, external databases linked, and the media files uploaded can be found in the app tree. Also, while adding any component, it is suggested to be dragged from the components section and dropped in the application tree at the desired position instead of dropping on the viewer for precise position adding of the component.
Properties panel – When you want to change the properties related to any component, you can use this section to modify them. The properties may include the component’s name, text on the component, its size, margins, padding, width, height, etc.
Basics of Thunkable platform
While creating a game or any application in Thunkable, you have to do two types of development which are Front end development and Back end development.
Front-end development involves designing the screens of your application and placing all the visible and invisible components on that screen that are necessary for your app. Components include buttons, images, labels, cameras, text-to-speech, and many others.
Visible components are those you can see being placed on the screen, while invisible ones are placed below the screen and perform some tasks but are not seen anywhere on the screen. We can do the Front-end development by going to the designer view on the Thunkable platform shown below.
For Back-end development, Thunkable provides drag-and-drop functionality with block-based coding. We have to code for the functionality of our application and write the logical part. We give instructions to the app by using blocks of various categories. For performing back-end development, we will have to go to the blocks view of the Thunkable as shown in the below image –
Creating a game using Thunkable
We need to follow four steps to create any game on a Thunkable platform which include –
- Create a basic design of all the screens and draw the same on paper or any online tool.
- Draw a flowchart of how your game will work and also go for writing pseudocode containing all the features your app should provide and describing the working of your game.
- Create a visual design that is the game’s front end by placing all the components on the screen and adding all the necessary screens to your app.
- Do the block-based back-end coding for your game which includes the central logical part and the working functionalities of the game.
Before you start creating any game in Thunkable, you should be aware of the following components and their usage in game development –
- Canvas – It is a touch-sensitive panel containing the stage where all your sprites characters will be displayed.
- Sprites – Sprites are the objects of the class sprite type. They represent any characters, obstacles, or things present on the game’s stage. You can create as many sprites of a sprite type as needed. All sprites of the same sprite type share similar properties like width, height, picture, x and y positions, etc. However, you can change it explicitly.
Creating a Maze game
We will create a game where you will be controlling the motion of the ball present in-game with the help of tilting your mobile phone in different directions. You have to ensure the ball does not touch any of the walls in the maze. If it touches, the ball will be repositioned to the starting point where it was initially placed.
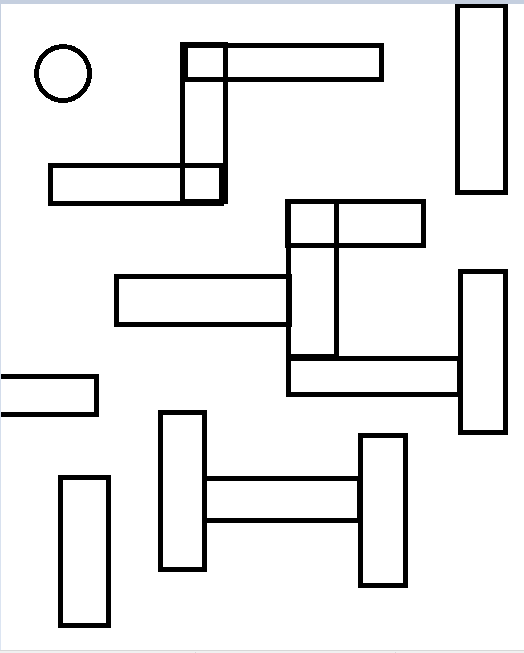
Step 1 – For this, we will draw a rough sketch of the design of our screen containing all the necessary things that will be visible in the game.
Step 2 – Now, we will write the pseudocode for our game. It will describe all the things happening in the game and it’s working.
- As soon as the screen opens, we can see a ball and a maze containing wall-like structures.
- The ball moves as and when you move and tilt your mobile phone.
- As per the tilting of the mobile phone, the position of the ball changes.
- If the ball touches any of the walls, it returns to the starting point where it was placed originally.
Step 3 – Now, we will create the front end of our app on Thunkable by going to the design view of the Thunkable project. Before this:
- Make sure that you sign up for the Thunkable platform.
- Create a new project.
- Name it as per your choice.
The front end of the game will look like the below image.
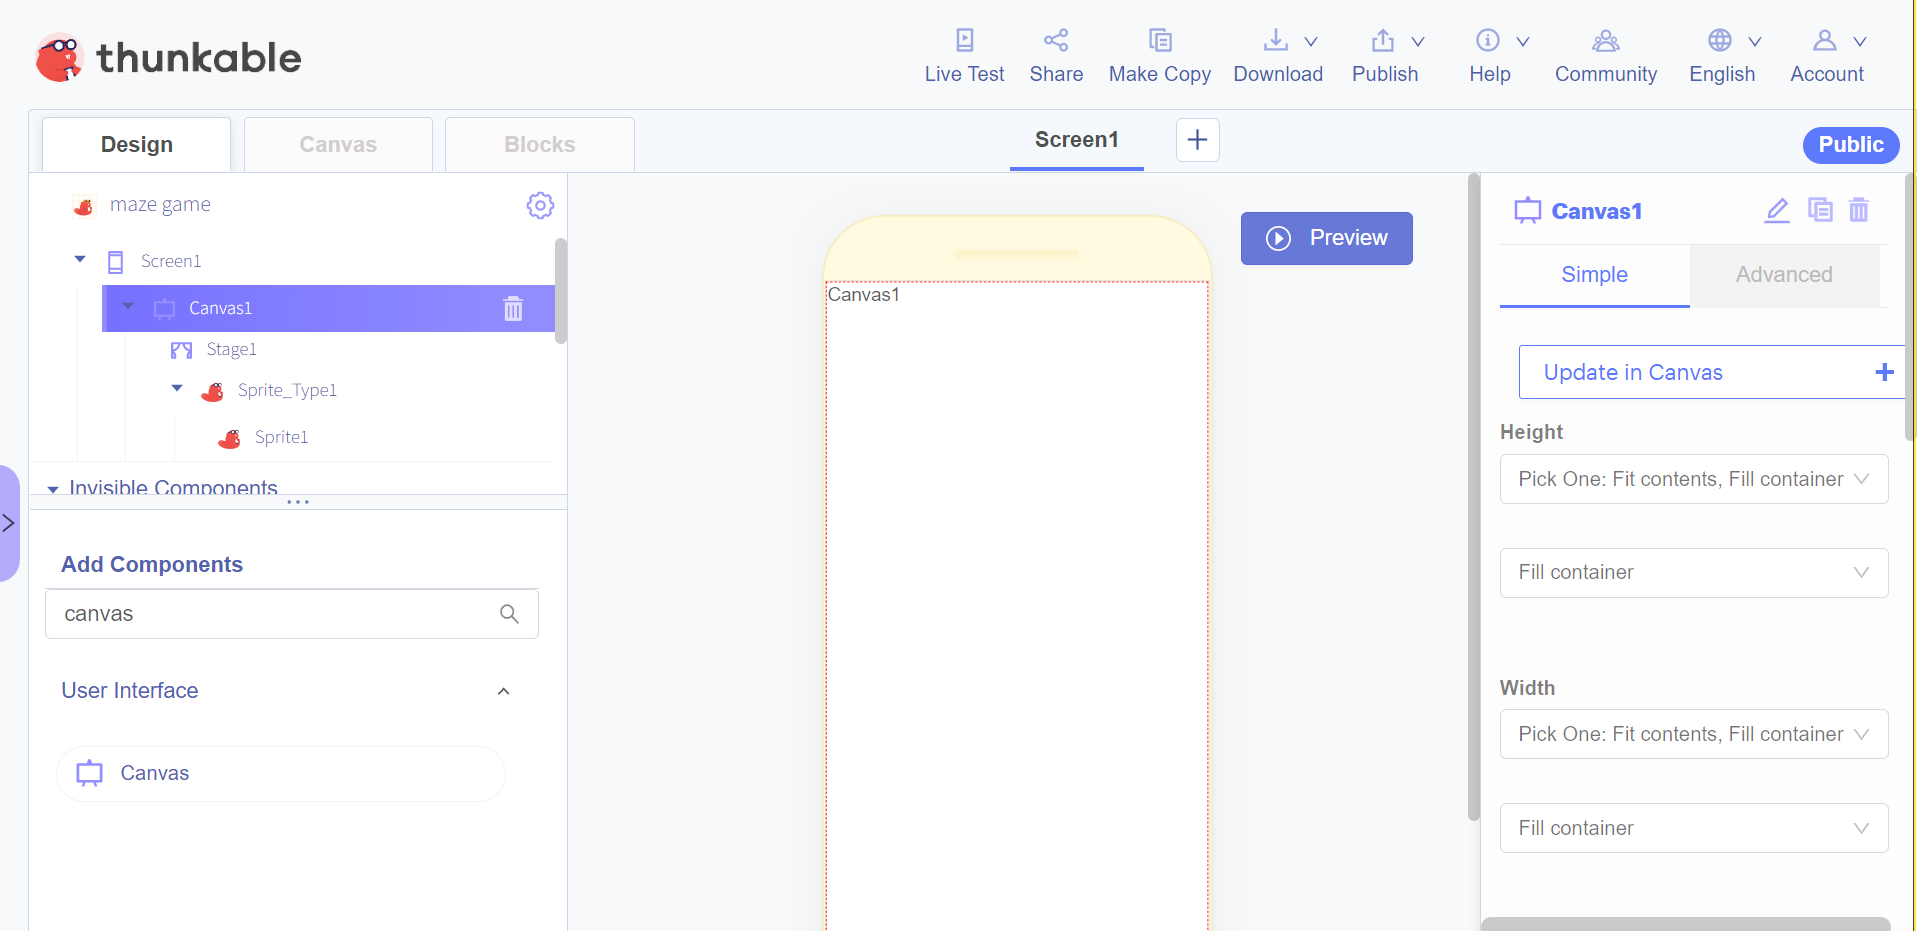
The first component we will place on the screen is the canvas, which automatically brings you the stage and the sprite type with one of its sprites. For this, search in add components section about canvas and then drag the canvas on screen view or the application tree. After adding, it will look like the below image.
After this, you can duplicate the sprite type by clicking on it in the app tree and clicking on the duplicate button in the properties panel. Name the sprites, one sprite type as wall type and another as ball type. For both of them, you can search on google and download the image and make sure that the image’s background is removed by visiting the removebg site.
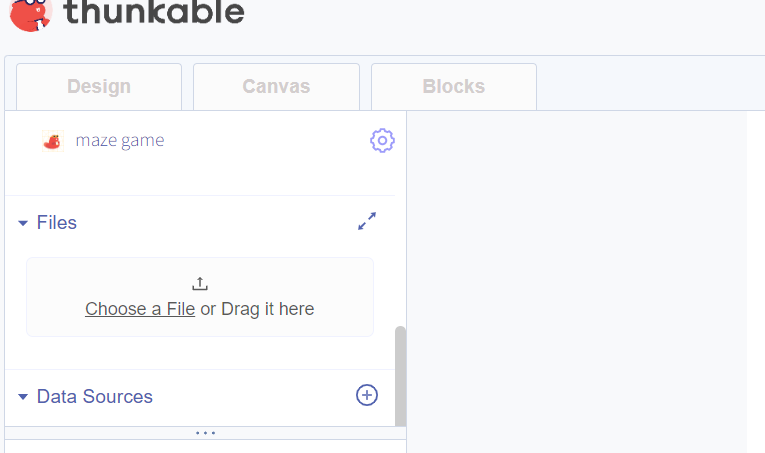
You can upload both photos in the application tree by scrolling down, clicking on choose a file section, and browsing the section as shown below. After this, you can click on the sprite type named wall type and then set the image in the picture section in the properties panel.
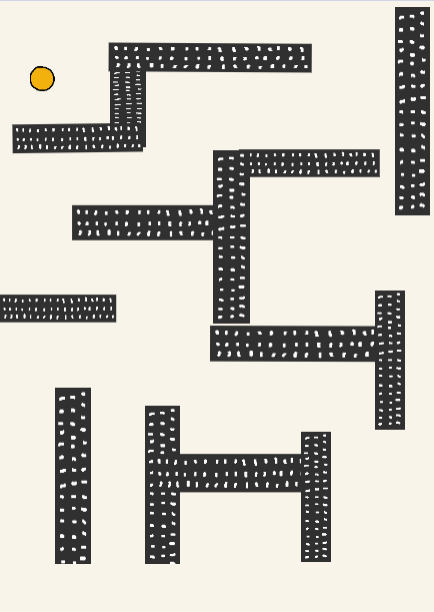
After that, you can rename the sprite of the wall type to wall1 and the ball type to the ball. You can further duplicate the wall1 sprite, create multiple walls, and arrange them on canvas by decreasing and increasing the widths and heights and repositioning them to make a maze pattern.
After following the above steps, the final front end should look as shown below.

The last thing that remains is adding an invisible component named gyroscope which can help us to recognize the amount and direction of motion of mobile devices based on which we can move the x and y positions of our ball too.
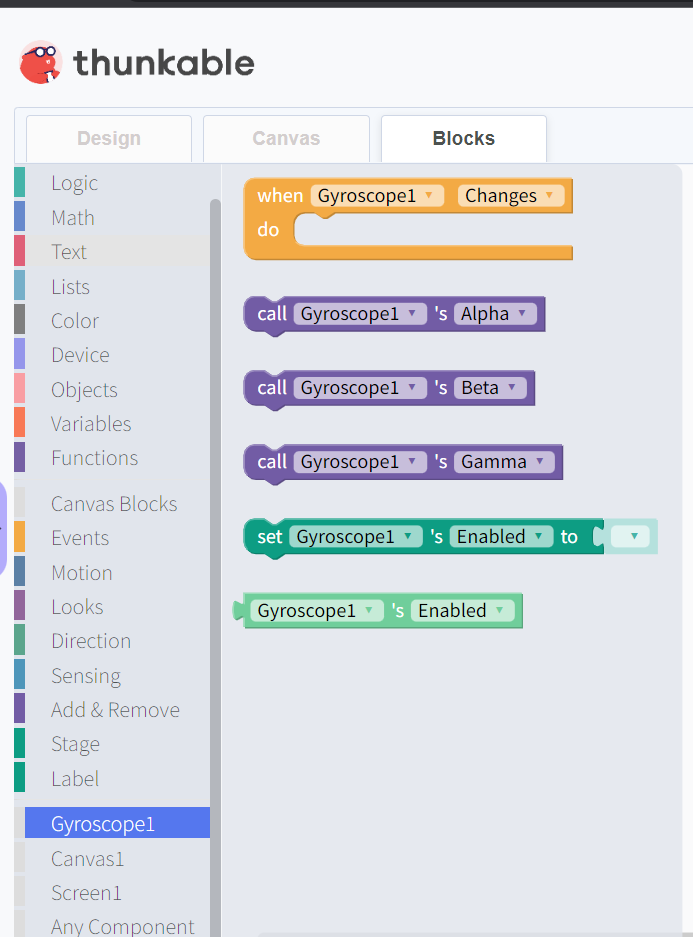
Gyroscope components change the acceleration of motion in three dimensions viz x, y, and z, denoted by gamma, betta, and alpha values, respectively.
Step 4 – Now, we will go to the blocks section of the Thunkable project and do the back-end coding for the game’s functionality.
The position of any sprite on the canvas is told by the x and y coordinates or position points that can be found in the properties panel of that sprite.
The first thing we have to code for is controlling the ball’s movement as per the changes in gyroscope values. When you go to the block section of the gyroscope, you will find the following blocks of code.
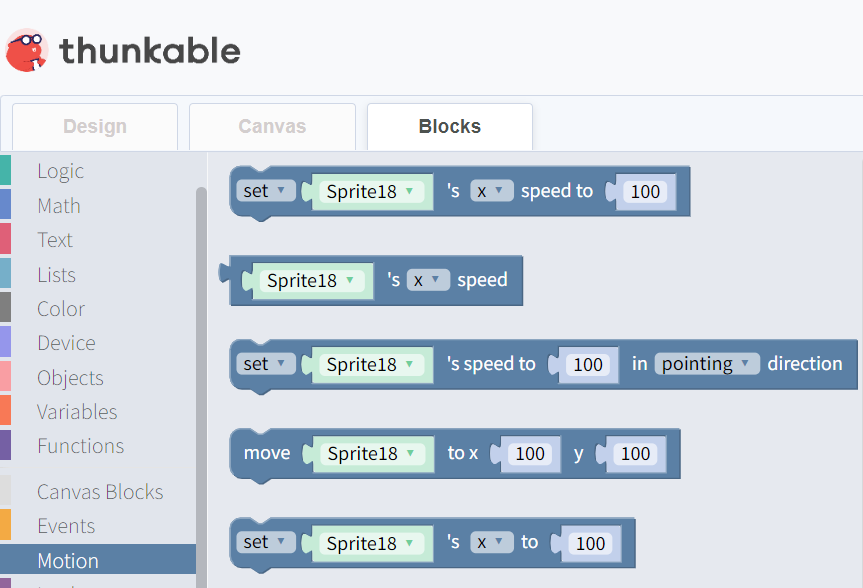
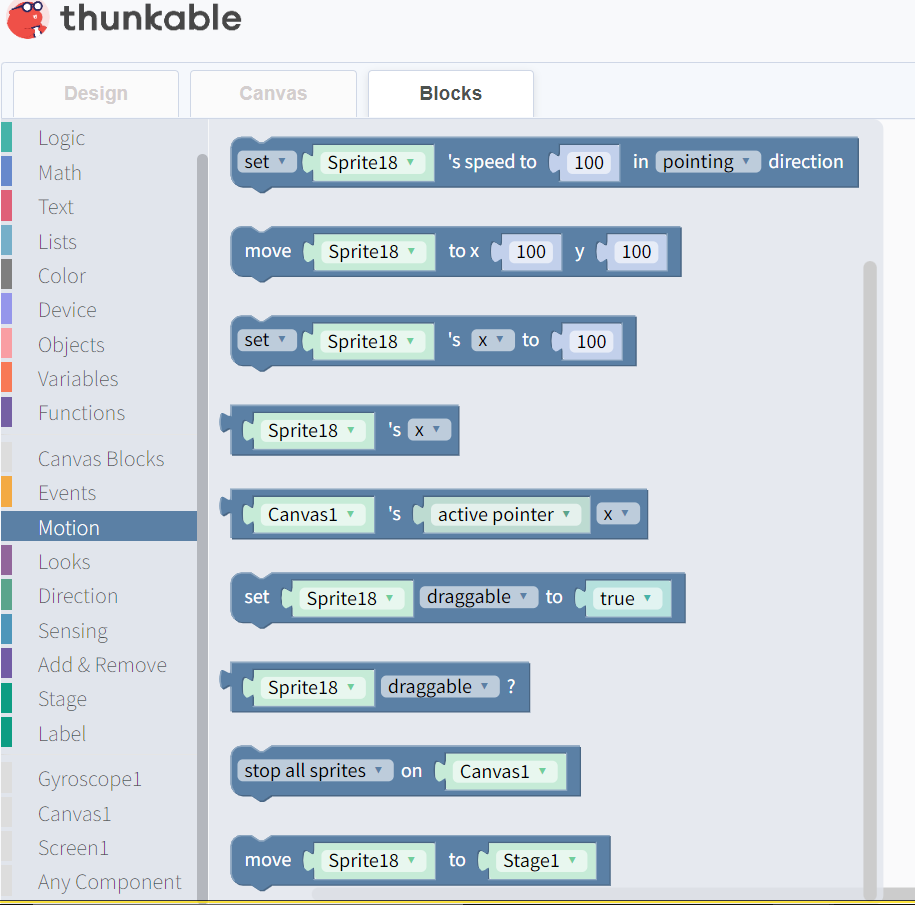
An event block here can help us determine the change in gyroscope values “when the gyroscope changes”. We can use this block and accordingly set our ball’s x and y speed so that it moves according to gyroscope changes. For setting the x and y speeds of the ball sprite, we can use the very first block available in the motion block section, which is “set ball’s x speed to _,” which can also be used for “set ball’s y speed to _” as shown below.
We will set the x speed of the ball to gamma changes of the gyroscope and y speed for the ball to betta’s changes as shown below.
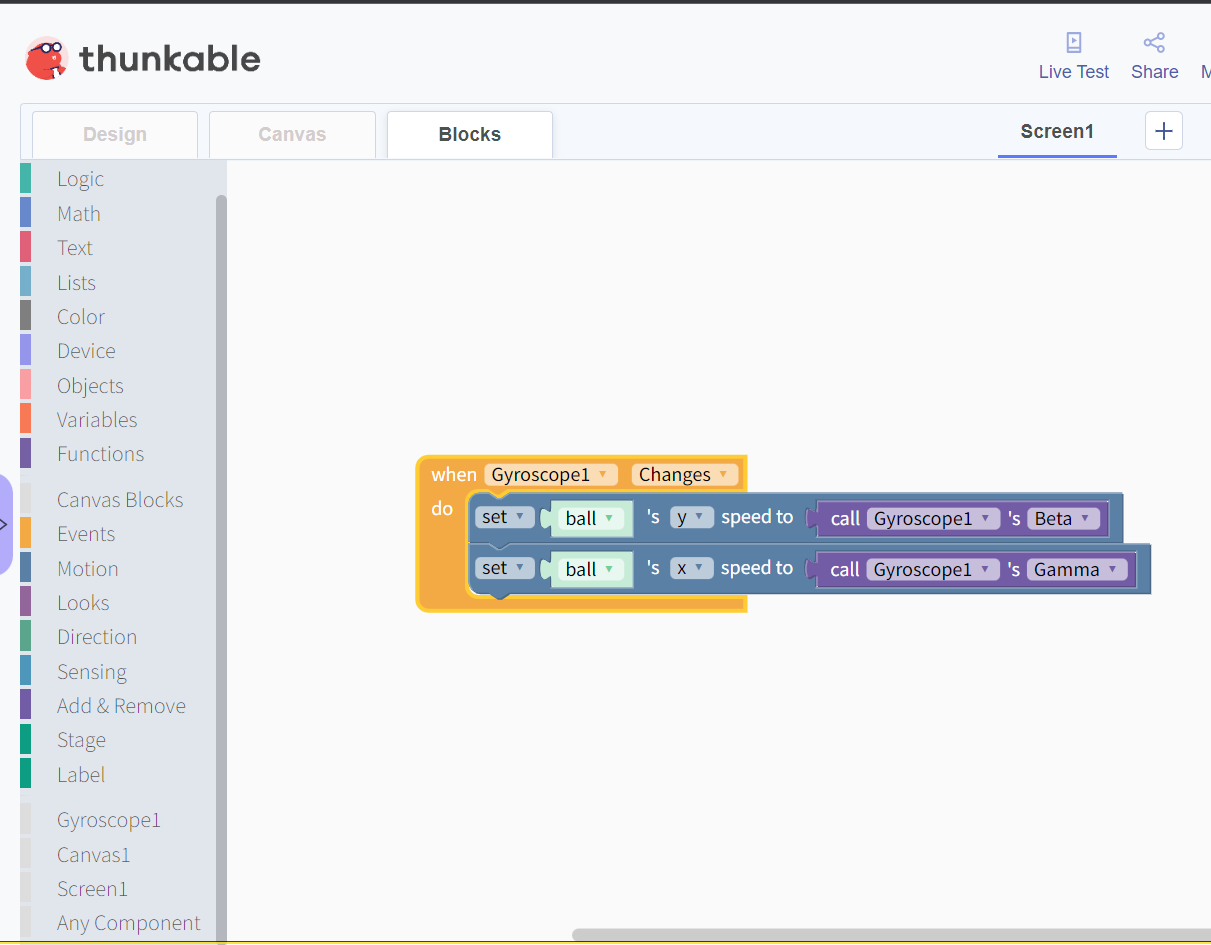
And thus, we completed the code for moving the ball per the mobile’s tilting.
Next, we will code that when the ball touches any of the walls, it should return to the initial x and y positions. We can check the x and y position of the ball by going to design, clicking on the ball, and checking the x and y position in the properties panel, as shown below.
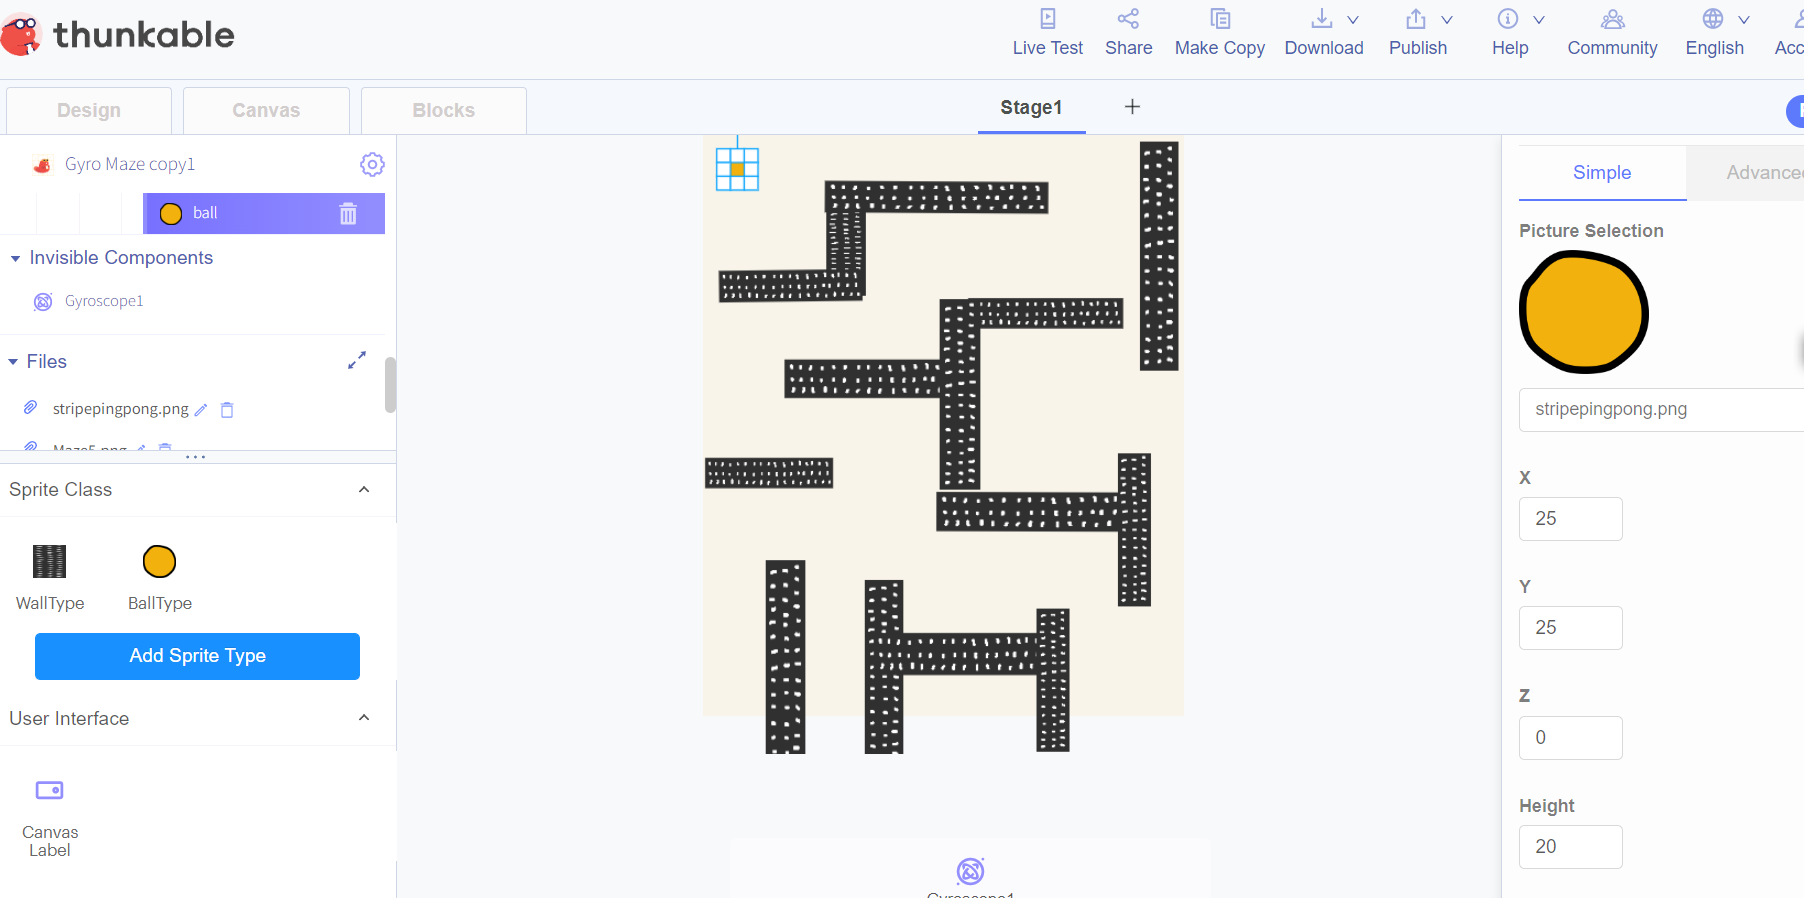
We can observe the ball’s x, and y positions are 25 and 25, respectively.
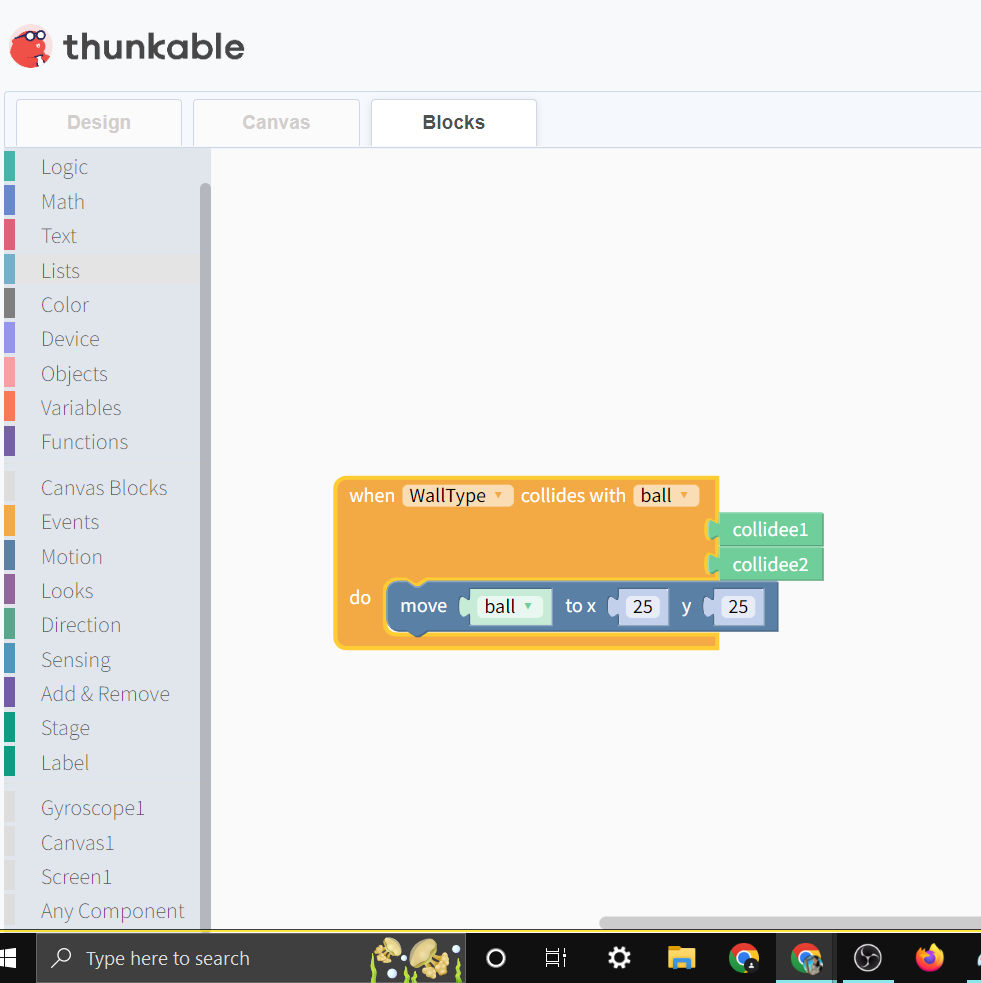
Now, we will go to the blocks section and check out the events block category, where we can find a block that can help us identify if the ball is touching any of the walls. The third block says – “When wall type collides with wall type,” which can be modified to “When the ball collides with wall type.” Wall type contains all the child sprites of walls in it; thus, this bloc can suffice our requirement.
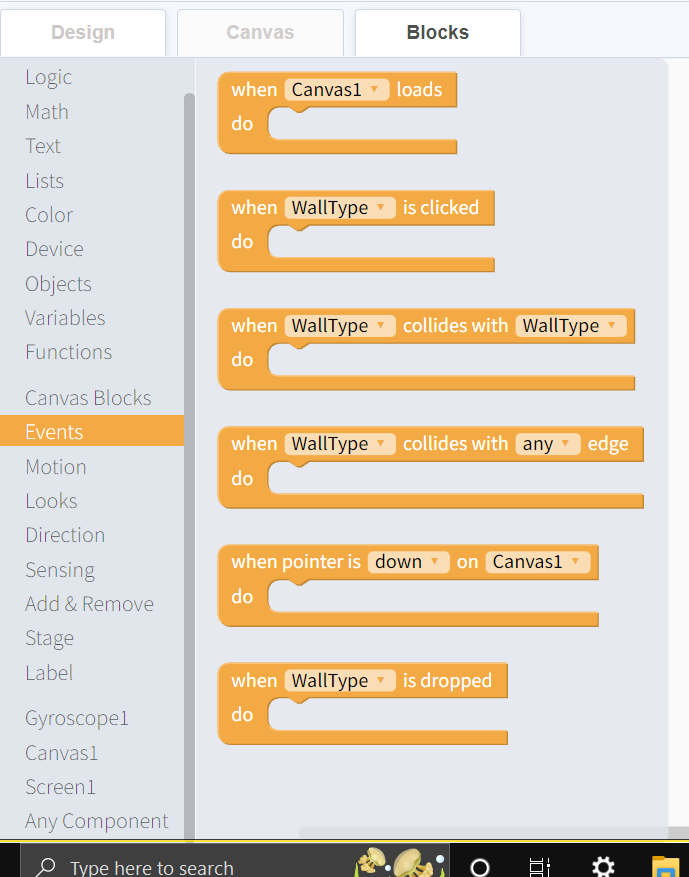
Further, if the collision of the ball and any wall sprite happens, we will move our ball to the original x and y positions. This block can be found in motions named “move sprite18 to x 100 y 100” that can be modified to “move the ball to x 25 y 25”.
Collectively, we can code for moving the ball back to starting position by using the below code.
You can check the working of your game on the Thunkable live app by installing it on your mobile device and signing in using the same account you used while creating the game.
Conclusion
It is easy to create a game in a Thunkable platform by following the specified steps in the article and having some knowledge of the Thunkable platform. Make sure you come up with a great unique idea and try it to create your own game on Thunkable.
After reading this blog you can create games on Thunkable. All you need to do is add the required backgrounds and sprites and then logically do the coding for each.
Scratch programming serves as an introduction to coding for kids. It helps kids get a grip on the basics that support all kinds of coding languages.
Kids can use Scratch to code their own interactive stories, animations, and games. In the process, they learn to think creatively, reason systematically, and work collaboratively — harnessing the essential 21st-century skills.
Learn to master the art making some best games in Scratch with our Scratch programming course for kids ages 8-14.
Try a free class and get started on the perfect pathway for kids to explore and learn coding with Scratch. Let kids explore their interests and grow; as a result, becoming better prepared for the future and all it holds!