Table of Contents
Introduction What is Pygame? Why Pygame? Setting up Pygame Pygame Basic Concepts Basic Code Design ConclusionIntroduction
Are you ready to dive further into the exciting world of Python programming? Today, we’re going to learn all about Pygame, a fantastic tool that lets you create awesome games using the Python programming language.
Whether you’re a beginner or already have some experience with coding, Pygame will take you on an adventure in the world of game development. If you are new to the Python environment, then read this beginner’s guide to Python by Codingal! You are good to go now, So buckle up, and let’s get started!
What is Pygame?
Pygame is defined by its creators as a “set of Python modules” tailored explicitly for writing and programming video games. But we will think of Pygame as a magical box filled with tools and tricks that allow you to build your own video games.

Pygame combines Python and gaming, making and drawing graphics, adding sounds, and making things move around in your game easier.
Why Pygame?
You may wonder why Pygame is a great choice for game development and other interactive applications. Well, apart from it being completely free and easy-to-use many other features make Pygame a fan favorite.
• Cross-Platform: Games created with Pygame can run on different operating systems like Windows, MacOS, and Linux easily.
• Abundance of Resources: There are plenty of online tutorials, documentation, and a supportive community to help you learn and grow.
• 2D Game Development: Pygame is perfect for creating 2D games, making it an ideal choice for side-scrolling adventures, puzzles, and arcade-style games.
• Graphics and Animation: It offers powerful tools to handle graphics and animations, allowing you to bring your game characters and world to life.
• Event Handling: Pygame provides a simple way to handle keyboard, mouse, and other events, making it easier to control your game.
• Well-Established Library: Pygame has been around for a long time, ensuring stability and reliability for your game development projects.
Now that you know what a handy tool Pygame is, let’s get it installed on your computer!
Setting up Pygame
To begin, you must install Python in your system. You can get it for free from the Python website (python.org) and install the latest version easily. You can visit their website for a detailed guide on how to install Python.
The next step is to install Pygame. You can get Pygame via the Python Package Installer—also known as the pip tool.
Open the command prompt on your computer and copy this code there:
pip install pygame
It’s as easy as that; Pygame has been installed. After the installation, try running a simple Pygame program to check if everything’s working correctly. Don’t fret; type this code in the command prompt next:
python -m pygame.examples.aliens\
Note that if you are using Python 3, make sure you have replaced “python” with “python3” in the command. If Pygame has been installed correctly, the “aliens” example game should launch, and you will see a small window with aliens and a spaceship.
You can enjoy and play the game using the arrow keys and the spacebar!
Pygame basic concepts
Before we write our own Pygame code, let’s cover a few Pygame concepts.
Initialisation and Modules
In the Pygame library, there are many modules and constructs. For example, “display” allows uniform access to your video display, while “joystick” allows abstract control of your joystick.
In order to use all the modules and constructs that Pygame has to offer, you need to import Pygame. You can use this command to import it:
Import pygame
pygame.init()
After importing pygame, we called its initialiser. This function calls the separate init() functions of all the included pygame modules.
Displays and Surfaces
You’ll also find several Python classes in Pygame. We’re going to study two of them: “Surface” and “Display.”
The Surface concept defines a rectangular area that you can draw on. Think of it as a blank slate or blank canvas.
The Display concept defines a window or a full screen through which everything can be viewed. A user can create a single display object using the following command:
.set_mode()
This returns a Surface object that represents the visible part of the window.
To put it simply, in Pygame, you create your game by drawing various elements like characters, backgrounds, and objects on a “Surface.” Once you have drawn everything, you display this “Surface” on the computer screen through the “Display,” and voilà – your game is ready to be played and enjoyed!
Rects and Images
Great job thus far! let’s continue and learn about two important concepts: “image module” and the “rectangle class.”
Imagine you are building a game, and you want to use real-life characters and images in your game. How will we achieve that? Luckily, you can use the image module to load and save pictures onto the Surface objects.
The cool thing is that rectangles are used so often in Pygame that there’s a special “Rect” class just to handle them. You can use rectangles to draw enemies, define players, manage collisions between them, and so on.
Now that you are well familiar with the major concepts let’s jump to the implementation part. Shall we?
Basic Code Design
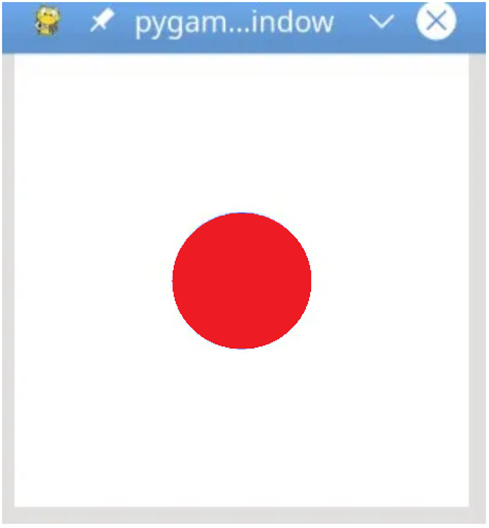
To further explain all the concepts we have studied above, let’s write a simple Pygame program that displays a blue circle on a white window to show how they work.
import pygame

pygame.init()

screen = pygame.display.set_mode([500, 500])

running = True

while running:

for event in pygame.event.get():

if event.type == pygame.QUIT:

running = False

screen.fill ((255, 255, 255))

pygame.draw.circle(screen, (0, 0, 255), (250, 250), 75)

pygame.display.flip()

pygame.quit()

pygame.draw.circle(screen, (0, 0, 255), (250, 250), 75)

pygame.display.flip()

pygame.quit()
Don’t worry. We’ll go line-by-line to help you understand how the above code works.
1. import pygame: It imports the Pygame library, allowing you to use its functions and classes as we discussed above.
2. pygame.init(): This line initializes Pygame and prepares it for use.
3. screen = pygame.display.set_mode([500, 500]): We have created a window named “screen” with a width of 500 pixels and a height of 500 pixels.
4. running = True: We have set up a variable called running, which controls the main game loop. As long as running is True, the game loop will continue running.
5. while running: This is the main game loop. Everything inside this loop will be executed repeatedly until running becomes False.
6. for event in pygame.event.get(): This line checks for events that occur during the game loop.
7. if event.type == pygame.QUIT: We have to check if the event is of type QUIT, which means the user wants to close the window (by clicking the “X” button).
8. running = False: If the user wants to close the window, this line sets running to False, which will exit the game loop and quit the game.
9. screen.fill((255, 255, 255)): We have filled the entire window with white colour. In the RGB colour chart, 255 represents the white colour.
10. pygame.draw.circle(screen, (255, 0, 0), (250, 250), 75): Now we draw a red circle on the window. The circle’s centre is at (250, 250), and its radius is 75 pixels.
11. pygame.display.flip(): This line updates the display, showing the drawn circle on the window.
12. pygame.quit(): This line quits Pygame and closes the game window when the game loop is finished.
When you run your code, the following screen will pop up:
Congratulations! You can use this as a starting point to create more complex games and interactive applications in Pygame.
Conclusion
Hopefully, this guide broke down all the complicated concepts for you and helped you get started with Pygame. You’ve just written your first Pygame code. But remember, this is just the beginning! Pygame has endless possibilities, and you can create all sorts of fun games using your creativity and coding skills.
You can take the time to master the fundamentals of Python and Pygame by taking our awesome Python courses. Let’s learn and program together!
Happy coding and gaming!