Scratch is a fantastic platform for aspiring game developers and animators. One common desire is to make a character or object appear to fly. This guide will break down the fundamental concepts and techniques to achieve a flying effect for your sprites in Scratch.
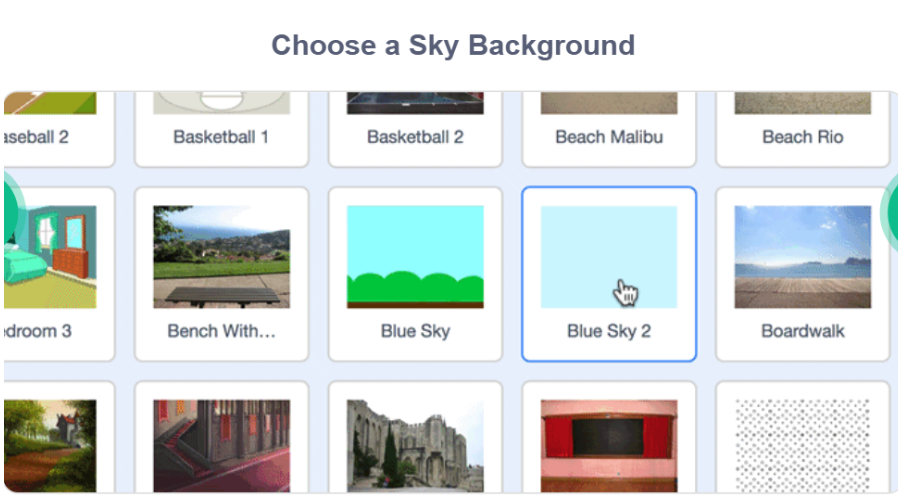
To make the sprite fly in scratch you have to follow these steps, First you have to select the blue sky background from the backdrop
- Select the Flying cat from the sprite section:
![]()
Basic Flying Mechanics: Changing Y-Position
The simplest way to make a sprite fly up and down is by changing its Y-position. In Scratch, the Y-axis controls vertical movement. Increasing the Y-position moves the sprite upwards, and decreasing it moves the sprite downwards.
Here’s a basic approach:
- Start with an Event: Begin with a when [green flag clicked] block or when [space key pressed] block, depending on when you want the flying action to start.
- Change Y by a Value: Use the change y by (10) block to make your sprite move upwards. A positive number will move it up, and a negative number will move it down.
- Continuous Movement: To make the sprite continuously fly, you can place the change y by block inside a forever loop. However, this will make it fly off-screen quickly. You’ll likely want to control this movement with user input.

Controlling Flight with User Input
To give the user control over the flying sprite, you can use conditional statements and keyboard inputs:
- 1.Using Arrow Keys:
- Drag out a forever loop.
- Inside the loop, use if <key [up arrow] pressed?> then and change y by (10) to make the sprite move up when the up arrow is pressed.
- Similarly, use if <key [down arrow] pressed?> then and change y by (-10) for downward movement.
- Adding Left and Right Movement (Optional):
- You can extend this concept to horizontal movement using the change x by block and the left/right arrow keys.
Incorporating Gravity for Realistic Flying
For games like Flappy Bird or those where the sprite needs to fall unless actively propelled upwards, you’ll want to simulate gravity. This involves a variable for vertical speed and constantly adjusting it.
- Create a Variable: Make a new variable called vertical speed (or y velocity).
- Apply Gravity: In a forever loop, continuously change [vertical speed] by (-1) (or a small negative number). This simulates gravity pulling the sprite down.
- Apply Vertical Speed to Sprite: Also in the forever loop, change y by (vertical speed). This moves the sprite based on its current vertical speed.
- Jump/Flap Action: When the user presses a key (e.g., spacebar), set [vertical speed] to (10) (or a positive number) to make the sprite jump or flap upwards, counteracting gravity.
- Ground Detection: Add an if <touching [ground sprite]?> then block to stop the sprite from falling through the ground. You might set [vertical speed] to (0) and set y to (ground level).
Animating Your Sprite for a Realistic Look
To make your sprite truly look like it’s flying, you’ll want to use costume changes:
- Multiple Costumes: Design or choose several costumes for your sprite that depict different stages of flight (e.g., wings up, wings down, gliding).
- Switch Costumes: Use the next costume block within a forever loop or a specific event. You might also want to add a wait (0.1) seconds block to control the animation speed.
- Conditional Animation: For more advanced animation, you could switch costumes based on whether the sprite is moving up or down, or if a specific key is pressed.
Tips for Success
- Start Simple: Begin with the most basic mechanics (player movement and one type of obstacle) and get them working perfectly before adding complexity.
- Test Constantly: Play your game frequently during development to catch bugs early and ensure the gameplay feels right.
- Use Variables: Variables are crucial for managing player speed, gravity, score, and other game states.
- Break Down Problems: If a task seems too big, break it down into smaller, manageable steps. For example, instead of trying to implement everything at once, focus on getting the player to jump, then add obstacles, then scoring, and so on.
- Look for Tutorials: The Scratch community is vast and supportive. Don’t hesitate to search for tutorials on specific mechanics you’re trying to implement.
- Experiment: Don’t be afraid to try different approaches and see what works best for your game.
- Have Fun! Remember that creating games should be an enjoyable process.