Table of Contents
What Is Roblox Studio? Your Free Tool to Create Roblox Games Step 1: Set Up Roblox Studio and Create Your Account Step 2: Choose a Template to Start Building Your Roblox Game Step 3: Customize Your Game World in Roblox Studio Step 4: Add Basic Scripts to Make Your Roblox Game Interactive Step 5: Test Your Roblox Game Thoroughly Before Publishing Step 6: Publish Your Game to the Roblox Platform Step 7: Promote Your Game and Grow Your Player Base 5 Tips to Create a Better Roblox Game from Day One Conclusion: Start Creating on Roblox Today FAQs
What Is Roblox Studio? Your Free Tool to Create Roblox Games
Before jumping into the steps, it helps to understand the tool you’ll be using. Roblox Studio is Roblox’s free, official game development environment. It runs on Windows and Mac and gives you everything you need to build, test, and publish a game — all in one place.
Here’s what Roblox Studio lets you do:
- Design 3D game worlds using parts, terrain, and pre-built models
- Add characters, objects, and sounds from the free asset library
- Write game logic using Lua, a beginner-friendly scripting language
- Test your game instantly without leaving the app
- Publish your finished game directly to the Roblox platform
You don’t need prior coding experience to start. Roblox Studio’s templates and visual editor make it easy to create a working game even if you’ve never written a line of code.
Step 1: Set Up Roblox Studio and Create Your Account
The first step to creating a game in Roblox is setting up your account and downloading Roblox Studio.
- Create a free Roblox account at roblox.com if you don’t already have one. It only takes a minute.
- Click the “Create” tab in the top navigation bar on the Roblox website. Roblox will prompt you to download Studio if it isn’t already installed.
- Open Roblox Studio from your applications folder or desktop shortcut. You’ll land on the Studio home screen where all your projects live.

| 📸 Roblox website — ‘Create’ tab highlighted in the top nav bar |
Once Studio opens, you’ll see options for “New”, “My Games”, and “Recent.” Click “New” to start a fresh project. You’ll be taken to the template picker in Step 2.
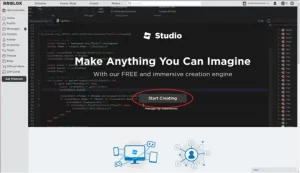
| 📸 Roblox Studio — ‘Start Creating’ home screen with ‘New’ selected |
Step 2: Choose a Template to Start Building Your Roblox Game
One of the best things about Roblox Studio is that you don’t have to start from a blank canvas. Roblox offers a full library of pre-built game templates that give you a working foundation instantly.
After clicking “New”, you’ll see a grid of templates in three tabs:
- All Templates — every available template in one view
- Theme — environments like Village, Castle, Pirate Island, and City
- Gameplay — game types like Obby, Racing, Team Arena, and Simulator
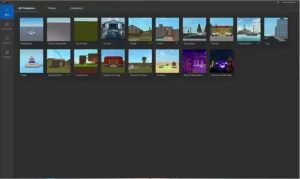
| 📸 Roblox Studio — All Templates grid: Baseplate, Flat Terrain, Obby, Racing, and more |
Choose the template that fits your idea. Want an obstacle course? Pick “Obby.” Want full creative control? Pick “Baseplate” or “Flat Terrain.”
| 💡 Beginner Tip: Start with the Obby or Flat Terrain template. They give you the right structure without overwhelming you with pre-built content you’d need to undo. |
Step 3: Customize Your Game World in Roblox Studio
Once you’ve selected a template, Roblox Studio opens your game world. This is where you’ll spend most of your building time. The interface has four main areas:
- Viewport (center) — the 3D view of your game world. Click and drag to move around.
- Explorer panel (right) — shows every object in your game as a tree structure.
- Properties panel (right, below Explorer) — lets you adjust settings for any selected object.
- Toolbox (left) — search and insert free models, sounds, images, and plugins.
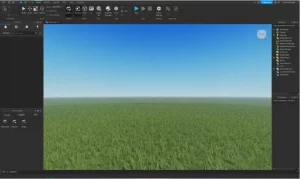
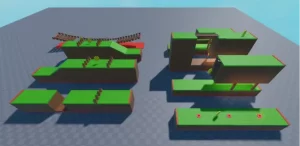
| 📸 Roblox Studio editor — Flat Terrain viewport open and ready to customize |
Add and Edit Parts
Parts are the building blocks of Roblox. Click “Part” in the Home toolbar to insert a block, sphere, cylinder, or wedge. Use Move, Scale, and Rotate to position it exactly where you want.

Use the Terrain Editor
The Terrain Editor lets you sculpt hills, rivers, forests, and mountains. Open it from the Home tab. Paint terrain types — grass, sand, water, snow — to create landscapes that feel alive.
Add Free Models from the Toolbox
The Toolbox has thousands of free community models: trees, buildings, vehicles, characters, and more. Search, click, insert — then customize them so your game looks unique.
Apply Colors and Materials
Select any part and use Color and Material options in the toolbar. Materials like Wood, Metal, and Neon give parts realistic or stylized textures instantly.
Step 4: Add Basic Scripts to Make Your Roblox Game Interactive
A great-looking world is a strong start, but scripts are what make a game actually fun to play. They control how things move, how players score points, what happens when a player touches an object, and much more.
Roblox uses Lua, a simple, beginner-friendly scripting language. You write scripts inside Roblox Studio’s built-in code editor.
To add your first script:
- In the Explorer panel, click the “+” icon next to “ServerScriptService”
- Select “Script” — a new script file opens in the code editor
- Try something simple: make a part glow when touched, or show a message when a player joins the game
| 💡 Example Lua script: game.Workspace.Part.Touched:Connect(function() print(“Player touched the part!”) end) — prints a message every time a player touches your part. |
Not ready to write code yet? That’s completely fine. Many templates have built-in scripts that work without any changes. You can always add scripting later as your confidence grows.
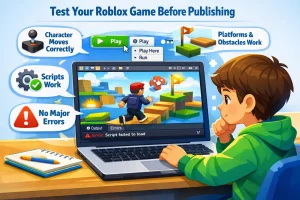
Step 5: Test Your Roblox Game Thoroughly Before Publishing
Before sharing your game with the world, you need to test it. Testing helps you catch bugs, spot broken parts, and make sure everything feels right for players.
To test in Roblox Studio:
- Click the green “Play” button in the top toolbar — you’ll control your character inside the game
- Use “Play Here” to start from your current camera position
- Use “Run” to simulate the server without a player character (useful for testing scripts)
Things to check during testing:
- Can your character move without getting stuck or falling through the floor?
- Do all platforms, ramps, and obstacles behave as intended?
- If you have scripts, do they trigger correctly and produce the right results?
- Is the Output panel free of red error messages?
- Does the game feel fun? Play through it as if you’re a brand-new player.
Press “Stop” to exit test mode and go back to editing. Fix anything that felt off, then test again until everything runs smoothly.
| 💡 Pro tip: Use the ‘Team Test’ feature (Test tab) to invite a friend into your game. Real players always find bugs that solo testing misses. |
Step 6: Publish Your Game to the Roblox Platform
Your game is ready — now it’s time to share it. Publishing makes your Roblox game live on the platform for other players to discover and play.
To publish:
- Go to File → Publish to Roblox (or press Alt+P on Windows / Cmd+P on Mac)
- Give your game a clear, descriptive name using words players would search for
- Write a game description that explains what players can expect. Use keywords naturally.
- Add a thumbnail — a custom image shown in the Roblox catalogue. Bright, colourful thumbnails earn more clicks.
- Set your game to Public so anyone can find it
- Click “Create” — your game is now live on Roblox!
| 📸 Roblox Studio — customized game world ready to publish |
After publishing, your game gets its own URL on Roblox.com. Share it with friends to get your first players and collect feedback for your next update.
Step 7: Promote Your Game and Grow Your Player Base
Publishing is a huge milestone — but it’s only the beginning. To grow your audience, you need to actively promote your game and keep improving it based on what players tell you.
Here’s how to get more players:
- Share your game link on social media – TikTok, YouTube Shorts, and Instagram Reels work especially well for Roblox content
- Post in Roblox developer communities on Reddit (r/roblox, r/robloxgamedev) and Discord servers
- Enter Roblox Game Jams — competitions that give your game visibility and connect you with other creators
- Update your game regularly — Roblox’s algorithm favours active games with recent changes
- Ask early players to like your game and share the link with their friends
5 Tips to Create a Better Roblox Game from Day One
- Keep it simple — The best first games have one clear goal. Don’t try to build an open-world RPG on your first attempt.
- Play other games first — Study what makes popular Roblox games fun. Think about what you could do differently or better.
- Use free assets wisely — The Toolbox has thousands of free models. Use them to speed up building, but always customise them so your game looks unique.
- Learn Lua early — Even basic scripting unlocks a huge range of gameplay possibilities. Start with touch events and timers.
- Save constantly — Hit Ctrl+S (or Cmd+S) often. Roblox Studio has autosave, but manual saving is a great habit.
Conclusion: Start Creating on Roblox Today
Creating a game on Roblox is one of the most rewarding things a young developer can do. You go from having an idea to having a real, playable game that friends — and strangers — can enjoy. And with Roblox Studio’s free tools, there’s nothing stopping you from starting right now.
Follow the seven steps in this guide: set up Roblox Studio, choose a template, customise your world, add scripts, test thoroughly, publish confidently, and promote consistently. Each step builds on the last, and the more games you create, the faster your skills will grow.
Ready to go further? Codingal’s Roblox Champion course teaches kids to build advanced 3D games using Lua programming in live 1:1 sessions with expert Computer Science teachers. Book your free trial lesson today.
FAQs
- What is Roblox Studio?
Roblox Studio is the official game development tool used to create Roblox games. It helps users build worlds, add objects, test gameplay, and publish games on the Roblox platform. - How do I create my first Roblox game?
To create your first Roblox game, open Roblox Studio, choose a template, customize your game world, test it, and then publish it. Starting with a simple game idea makes the process easier for beginners. - Is Roblox Studio free to use?
Yes, Roblox Studio is free to download and use. Anyone with a Roblox account can access it and start building games without paying. - Do I need coding to make a Roblox game?
No, you do not need coding to get started. Beginners can use templates and built-in tools first. Learning Lua scripting later helps add advanced features and gameplay mechanics. - What kind of games can I make in Roblox?
You can create many types of games in Roblox, such as obstacle courses, racing games, simulators, role-playing games, tycoons, and adventure games. Beginners should start with smaller, simpler projects. - What programming language does Roblox use?
Roblox uses Lua, a beginner-friendly programming language. It helps creators add interactive features, game rules, and custom mechanics to their projects. - How do I test my game in Roblox Studio?
You can test your game by clicking the Play button inside Roblox Studio. This lets you experience the game as a player and check for bugs, broken sections, or gameplay issues. - Can I publish my Roblox game for others to play?
Yes, once your game is ready, you can publish it on Roblox. After publishing, other users can discover and play your game depending on your settings. - How can I make my Roblox game better?
You can improve your game by testing it often, asking friends for feedback, fixing bugs, adding rewards or checkpoints, and making the gameplay more fun and clear for players. - Is Roblox game creation good for kids?
Yes, creating games in Roblox is great for kids because it builds creativity, problem-solving, design thinking, and coding skills in a fun and interactive way.